This blog is first in the series of blog that will follow in the Yocto Project series.
It will be my personal reference for the Yocto Project that i am pursuing as my hobby. my aim would be to concentrate on the Bitbake, and Qemu parts, others will follow will follow.
so first step would be to visit the Yocto Project website and explore the blog, documentation and the smaller things there, just to get a feel of the project.
The main thing to remember about the project would be
Q What is Yocto Project ?
It is a set of scripts that are designed to produce a working Linux image.
The scripts are written using Bitbake which is a utility written in python. This is used for parsing the configuration settings that you have provide.
Its a Build appliance that works on the poky project to generate the images. I would advice not going too deep into these other collaborative projects as of now .
this picture here sums it up real good

we would however be concentrating on the following..
1. User Config
2. Metadata
3. Machine BSP
4. Image generation
Q What do i need ?
at-least 50GB of hard disk space... (100GB is what they say. i have never gone beyond 40) there are methods to conserve that too..
I would advice that you take a structured approach to the project. The fact that you are interested in yocto project, it is safe to assume that you have a Linux workstation. Ubuntu is preferred because of its support system, but other distros like OpenSuSE and Fedora are also supported, its your choice here as long as it is Linux. :)
create a Directory structure with Yocto being the parent directory, and create a subdirectory called downloads, sstate-cache and BSP inside it.. the reason would be clear as we progress, but this approach would save some efforts later on.
If you wish you can also create a separate Git repository if you want to share your scripts later on on github or other such methods.. its up to you..
so in my scheme i make the following directories...
Yocto
-------- downloads
-------- bsp
-------- Yocto-101 (my github repo)
I will be sharing all these scripts on my github page.. so you can always follow..
https://github.com/12mhz/Yocto-101
you can follow me here for my other projects here
https://github.com/ArunMKumar (PS: i am just starting out :) ) or
in this first post we will BAKE our first recipe... tweak the basics in the most basic script and learn something about Bitbake.
so lets start...
first of all you would need the following packages on the Ubuntu system..
use this command... many of them would already be present out of the box
once you are done with this step... we need one more repository... basically the "Poky"
as you would be doing this i would seriously advice you to join the yocto project mailing list.. its really helpful. by the time these repos are being cloned you can have a look at the project website. It has some serious contributors and associated brands that will show the nature of this project. This may not be as popular as the arduino project or others but it has its own type of followers.
now if you have the repositories at your disposal..
I would leave the discussion about Poky, Bitbake and other things for a later post as of right now our aim is to build a Linux image and boot it into qemu.
You would now end up with a directory structure like this... very well done.
 // Ignore the build directory for now.
you now have to run the following commands... from within this directory. actually you can run this from any directory if you give the path correct. First decide where you want the Build directory to be present. it can be some other folder anywhere (i have not tried symbolic links).
The Build directory contains your local build specific scripts and this will contain your final image, Please note that all of this is still configurable, and if you wish you can have your resultant image be placed somewhere entirely off this directory, I would advice against it as of now... so let the structure of the build directory be intact. The directory structures are entirely the choice of user, as they prefer it.
How do i create the build directory?
I like my build directory in the parent directory and not inside poky. so first make sure that you are in the parent directory and poky, bsp, downloads ,sstate-cache are on the same level and run this command.
$ source poky/oe-init-build-env
you should see the following output.
### Shell environment set up for builds. ###
You can now run 'bitbake <target>'
Common targets are:
core-image-minimal
core-image-sato
meta-toolchain
adt-installer
meta-ide-support
You can also run generated qemu images with a command like 'runqemu qemux86'
The reason for running this command is it sets up runtime variables that are necessary for the build process and are lost when you close the terminal, these wont be available on other terminal tabs too, they are specific to one session.
now you would see a directory named build here. Oops you are inside the build directory. :)
If you hate the name build just add the name to the end of the command
$ source poky/oe-init-build-env <dir_name>
you would land inside that directory....
well look at the new directory structure....

we see a directory named conf. Lets go inside it...
we see a file named local.conf
before reading further, have a careful look at the file, your patience will be rewarded, the comments are self-explanatory and easy to grasp.
The variable TOPDIR is the path to your build directory and everything else is taken relative to it.
we have to make some changes to it now...
find and modify DL_DIR
DL_DIR ?= "${TOPDIR}/../downloads"
why?
because we have created a download directory for ourselves, the reason being each build will download packages from the internet, and these are reusable and keeping all the downloads in one directory in top level helps sharing it among builds. if you download for each build you will finish your disk space sooner with redundant files which could have been shared, also not to mention the bandwidth usage, The first build will take time as it has t download lots of packages, the subsequent builds will be faster by this method.
The machine type is already set as default
MACHINE ??= "qemux86"
we shall have a look at the differences between ?= and ??= in the coming posts :)
You are good to go now, I would have made some changes regarding the Parallel jobs and number of threads, but the latest poky release manages that very well, so we can see that later.
coming back to the top level directory... run the following command
$ bitbake -c fetchall core-image-minimal
This can take a whole lot of time (in hours) depending upon your internet connection.
Once you have downloaded all the packages...
Once this is finished.. .look inside the tmp directory inside the build directory.
you can see the following directory structure deploy->images->qemux86
within this directory you will have the image that was built.
come back to the Parent directory that is build and run the following command
You should see something like this coming up on your screen.
This post has derived its content from numerous documentation from the Linux foundation and my experience of tinkering around on a Linux system, If something in the post is not working please mention it in the comments. I will be more than happy to help.. till then
HAPPY HACKING
It will be my personal reference for the Yocto Project that i am pursuing as my hobby. my aim would be to concentrate on the Bitbake, and Qemu parts, others will follow will follow.
so first step would be to visit the Yocto Project website and explore the blog, documentation and the smaller things there, just to get a feel of the project.
The main thing to remember about the project would be
Q What is Yocto Project ?
It is a set of scripts that are designed to produce a working Linux image.
The scripts are written using Bitbake which is a utility written in python. This is used for parsing the configuration settings that you have provide.
Its a Build appliance that works on the poky project to generate the images. I would advice not going too deep into these other collaborative projects as of now .
this picture here sums it up real good
we would however be concentrating on the following..
1. User Config
2. Metadata
3. Machine BSP
4. Image generation
Q What do i need ?
at-least 50GB of hard disk space... (100GB is what they say. i have never gone beyond 40) there are methods to conserve that too..
I would advice that you take a structured approach to the project. The fact that you are interested in yocto project, it is safe to assume that you have a Linux workstation. Ubuntu is preferred because of its support system, but other distros like OpenSuSE and Fedora are also supported, its your choice here as long as it is Linux. :)
create a Directory structure with Yocto being the parent directory, and create a subdirectory called downloads, sstate-cache and BSP inside it.. the reason would be clear as we progress, but this approach would save some efforts later on.
If you wish you can also create a separate Git repository if you want to share your scripts later on on github or other such methods.. its up to you..
so in my scheme i make the following directories...
Yocto
-------- downloads
-------- bsp
-------- Yocto-101 (my github repo)
I will be sharing all these scripts on my github page.. so you can always follow..
https://github.com/12mhz/Yocto-101
you can follow me here for my other projects here
https://github.com/ArunMKumar (PS: i am just starting out :) ) or
in this first post we will BAKE our first recipe... tweak the basics in the most basic script and learn something about Bitbake.
so lets start...
first of all you would need the following packages on the Ubuntu system..
use this command... many of them would already be present out of the box
sudo apt-get install gawk wget git-core diffstat unzip texinfo gcc-multilib \ build-essential chrpath libsdl1.2-dev xterm
make sure you have python 2.6 or 2.7, python 3.x would NOT work here.once you are done with this step... we need one more repository... basically the "Poky"
git clone http://git.yoctoproject.org/git/poky
These
things will take time based on your internet speed... well the first
round of build is known to take a hell lot of time if you have a slow
internet connection, broadband is preferred...as you would be doing this i would seriously advice you to join the yocto project mailing list.. its really helpful. by the time these repos are being cloned you can have a look at the project website. It has some serious contributors and associated brands that will show the nature of this project. This may not be as popular as the arduino project or others but it has its own type of followers.
now if you have the repositories at your disposal..
I would leave the discussion about Poky, Bitbake and other things for a later post as of right now our aim is to build a Linux image and boot it into qemu.
You would now end up with a directory structure like this... very well done.
you now have to run the following commands... from within this directory. actually you can run this from any directory if you give the path correct. First decide where you want the Build directory to be present. it can be some other folder anywhere (i have not tried symbolic links).
The Build directory contains your local build specific scripts and this will contain your final image, Please note that all of this is still configurable, and if you wish you can have your resultant image be placed somewhere entirely off this directory, I would advice against it as of now... so let the structure of the build directory be intact. The directory structures are entirely the choice of user, as they prefer it.
How do i create the build directory?
I like my build directory in the parent directory and not inside poky. so first make sure that you are in the parent directory and poky, bsp, downloads ,sstate-cache are on the same level and run this command.
$ source poky/oe-init-build-env
you should see the following output.
### Shell environment set up for builds. ###
You can now run 'bitbake <target>'
Common targets are:
core-image-minimal
core-image-sato
meta-toolchain
adt-installer
meta-ide-support
You can also run generated qemu images with a command like 'runqemu qemux86'
The reason for running this command is it sets up runtime variables that are necessary for the build process and are lost when you close the terminal, these wont be available on other terminal tabs too, they are specific to one session.
now you would see a directory named build here. Oops you are inside the build directory. :)
If you hate the name build just add the name to the end of the command
$ source poky/oe-init-build-env <dir_name>
you would land inside that directory....
well look at the new directory structure....
we see a directory named conf. Lets go inside it...
we see a file named local.conf
before reading further, have a careful look at the file, your patience will be rewarded, the comments are self-explanatory and easy to grasp.
The variable TOPDIR is the path to your build directory and everything else is taken relative to it.
we have to make some changes to it now...
find and modify DL_DIR
DL_DIR ?= "${TOPDIR}/../downloads"
why?
because we have created a download directory for ourselves, the reason being each build will download packages from the internet, and these are reusable and keeping all the downloads in one directory in top level helps sharing it among builds. if you download for each build you will finish your disk space sooner with redundant files which could have been shared, also not to mention the bandwidth usage, The first build will take time as it has t download lots of packages, the subsequent builds will be faster by this method.
The machine type is already set as default
MACHINE ??= "qemux86"
we shall have a look at the differences between ?= and ??= in the coming posts :)
You are good to go now, I would have made some changes regarding the Parallel jobs and number of threads, but the latest poky release manages that very well, so we can see that later.
coming back to the top level directory... run the following command
$ bitbake -c fetchall core-image-minimal
This
command guarantees that you will have all the packages before you wish
to build, It will NOT start a build but would fetch the necessary
packages. I prefer this because my INTERNET connection is not
predictable :)This can take a whole lot of time (in hours) depending upon your internet connection.
Once you have downloaded all the packages...
$ bitbake core-image-sato
This will build a image with GUI. This command can also take lots of time and CPU power.Once this is finished.. .look inside the tmp directory inside the build directory.
you can see the following directory structure deploy->images->qemux86
within this directory you will have the image that was built.
come back to the Parent directory that is build and run the following command
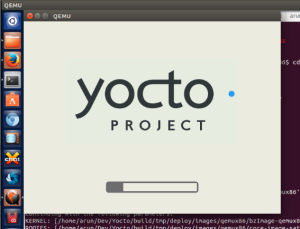
$ runqemu qemux86
Thats is you should now see the Image booting up a Qemu machine.
You should see something like this coming up on your screen.
This post has derived its content from numerous documentation from the Linux foundation and my experience of tinkering around on a Linux system, If something in the post is not working please mention it in the comments. I will be more than happy to help.. till then
HAPPY HACKING
Good blog. Keep sharing. I love them Are you also searching for Cheap Essay24/7? we are the best solution for you. We are best known for delivering cheap essays to students without having to break the bank
ReplyDelete